Controls are the basic element of GUI or user interface which allow users to interact with the application. In previous post
How to create Frame in AWT we learnt How to create Frame in AWT. In this post we are going to learn how to add common controls on frame.
Some most common controls:
- Label
- TextField
- Button
- TextArea
- CheckBox
- RadioButton
- List
- Choice
Label:
Label is the simplest control and It is generally used to display unselectable text.

Declaration Syntax:
Label _label1 = new Label(“Label Text”);
in above syntax we have declared and initialized a label with the text “Label Text”.
Code for adding a label on the frame:
import java.awt.*;
class LabelExample
{
    //declaring frame object
    Frame _frame;
    //declaring label object
    Label label1;

    LabelExample()
    {
        _frame = new Frame("Window Title"); // initializing frame
        _frame.setSize(200,200); // The setSize method will set the heigth and width of the frame.
        _frame.setLayout(null); // setting frame's layout to null so that we can add control(s) on the frame at specific location

        label1 = new Label("Label 1"); // Intialising Label with the text "Label 1"

        // setBounds method is used to set the label position, height and width of the label
        // syntax for setBounds(xPos,yPos,width,height)
        label1.setBounds(50,40,50,20);

        _frame.add(label1); //  add method will add the label on the frame

        _frame.show(); // show() method will display the frame at runtime.
    }

    public static void main(String args[])
    {
        new LabelExample();
    }
}
TextField:
TextField is a very common and basic control which allows users to enter small amount of text in a single line.

Syntax:
TextField text_field = new TextField(20);
We can specify the maximum number of the columns (characters) allowed for the text field by passing the value in the constructor. It the above syntax i have used 20 as the maximum number, you can use any number according to your requirement.
code for adding text field on the frame:
import java.awt.*;
class TextFieldExample
{
    Frame fob;

    TextField text_field;

    TextFieldExample()
    {
        fob= new Frame("Window Title");
        fob.setSize(200,200); // setSize will set the heigth and width of the frame
        fob.setLayout(null);

        text_field = new TextField(20); // initializing textfield with maximum 20characters length
        text_field.setBounds(40,70,100,20); // setting textfield on the frame


        fob.add(text_field); // adding textfield on the frame
        fob.show(); // display the frame on the runtime
    }

    public static void main(String args[])
    {
        new TextFieldExample();
    }
}
Button:
We all are familiar with button, they allow user to perform some operation like: save / close / open or to perform any other action related with the task.

Syntax:
Button button1 = new Button("Button1");
We have passed a string “Button1” in constructor of the Button class, it will set the button text to “Button1”.
import java.awt.*;
class ButtonExample
{
    Frame _frame;
    Button button1;

    ButtonExample()
    {
        _frame= new Frame("Window Title");
        _frame.setSize(200,200);
        _frame.setLayout(null);

        button1= new Button("Button1"); // Initializing button with text Button1.
        button1.setBounds(70,100,50,20);// setting button on the frame.

        _frame.add(button1); // adding button on the frame.
        _frame.show(); // show() method will display the frame on runtime
    }

    public static void main(String args[])
    {
        new ButtonExample();
    }
}
TextArea:
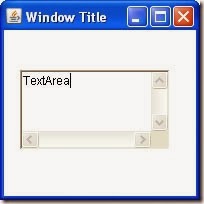
TextArea is used to display very long text (ex. action logs) to users and it also allows user to enter or edit values in text area.
Syntax:
TextArea text_area = new TextArea();
We can also specify the size of textarea in rows and the columns (maximum characters allowed) by :
TextArea ( int rows, int cols );
import java.awt.*;
class TextAreaExample
{
    Frame _frame;
    TextArea text_area; // declaring text area object

    TextAreaExample()
    {
        _frame= new Frame("Window Title");
        _frame.setSize(200,200);
        _frame.setLayout(null);

        text_area = new TextArea(); // initializing text area object
        text_area.setBounds(20,70,150,80); // setting position and height width of textarea

        _frame.add(text_area); // adding textarea on frame
        _frame.show();
    }

    public static void main(String args[])
    {
        new TextAreaExample();
    }
}
CheckBox
We all are familiar with checkbox. They allows user to select one or multiple option.

Syntax:
Checkbox checkbox1= new Checkbox("chekbox1");
import java.awt.*;
class CheckboxExample
{
    Frame _frame;
    Checkbox checkbox1;

    CheckboxExample()
    {
        _frame= new Frame("Window Title");
        _frame.setSize(200,200);
        _frame.setLayout(null);

        checkbox1= new Checkbox("chekbox1"); // initializing checkbox
        checkbox1.setBounds(70,100,80,20);

        _frame.add(checkbox1 ); // adding checkbox on frame
        _frame.show();
    }

    public static void main(String args[])
    {
        new CheckboxExample();
    }
}
RadioButton:
Radio Button is a group of buttons from which only one button can be selected a time. For creating radio button, we need to add check boxes to checkbox group.

Syntax for Creating
CheckboxGroup:
CheckboxGroup checkboxGroup_name = new CheckboxGroup();
import java.awt.*;
class RadioButtonExample
{
    Frame _frame;
    CheckboxGroup chkgp;
    Checkbox r1,r2;

    RadioButtonExample()
    {
        _frame= new Frame("Window Title");
        _frame.setSize(200,200); // The setSize method will set the heigth and width to 400px.
        _frame.setLayout(null);

        chkgp = new CheckboxGroup(); // initializing checkbox group

        // initializing checkbox by passing caption, checkbox group and default value
        r1 =new Checkbox("FristRadioButton",chkgp, true);
        r2 =new Checkbox("SecondRadioButton",chkgp, false);

        r1.setBounds(20,80,130,20);
        r2.setBounds(100,110,130,20);

        _frame.add(r1);
        _frame.add(r2);

        _frame.show(); //the Show Method is used to show the Frame on screen
    }

    public static void main(String args[])
    {
        new RadioButtonExample();
    }
}
List
The List presents the user with a scrolling list of text items. The list can be set up so that the user can choose either one item or multiple items.

Syntax:
List list_1 = new List();
adding items in list:
//additem() method is used to add item in list.
list_1.addItem("java");
list_1.addItem("JSp");
list_1.addItem("J2ME");
Code for creating list and adding items:
import java.awt.*;
class ListExample
{
    Frame _frame;
    List list_1;

    ListExample()
    {
        _frame = new Frame("Window Title");
        _frame.setSize(200,200); // The setSize method will set the heigth and width to 400px
        _frame.setLayout(null);

        list_1 = new List(); // intializing list object

        //adding item in list
        list_1.addItem("java");
        list_1.addItem("JSp");
        list_1.addItem("J2ME");

        list_1.setBounds(40,70,100,50);
        _frame.add(list_1);

        _frame.show();
    }

    public static void main(String args[])
    {
        new ListExample();
    }
}
Choice (Dropdown or Combo box):
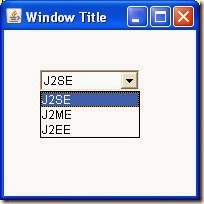
The Choice lets the user choose one of several choices. The current selected choice is displayed as the title of the menu.
Syntax:
Choice choice_name = new Choice();
adding item in choice:
choice.addItem("J2SE");
choice.addItem("J2ME");
choice.addItem("J2EE");
import java.awt.*;
class ChoiceExample
{
    Frame _frame;
    Choice choice;

    ChoiceExample()
    {
        _frame= new Frame("Window Title");
        _frame.setSize(200,200);
        _frame.setLayout(null);

        choice=new Choice(); // initializing chocie

        //adding item in choice
        choice.addItem("J2SE");
        choice.addItem("J2ME");
        choice.addItem("J2EE");

        choice.setBounds(40,70,100,50);

        _frame.add(choice); // adding choice on frame
        _frame.show();
    }

    public static void main(String args[])
    {
        new ChoiceExample();
    }
}


